![]()
|
26th October 2008 Made a few changes to the arm today, cut the inner poles down a bit and fixed the inside pole to the middle pole with a screw, trimmed both so they don't protrude into the shoulder section too far and fixed some hosepipe inside so they can be pushed out and pulled back easily.
|
|
|
|
21st June 2008 The plunger I made didn't last past the Space Centre event, as in a small person pulled it off... Another Dalek builder gave me a tip on how to get a rubber NSD plunger so I took his advice and a few weeks later the little sucker arrived... Pictures below show the two I made, and the rubber version, which looks a bit brown in the picture but is really black...
|
|
|
|
11th May 2008... Finally painted the ball joints of the gun and arm, and lined the brackets in self adhesive felt to stop them scratching - hopefully...! Also painted the plunger a matt black... Click here to see what else I did today...
|
|
|
|
1st May 2008... Change of plan... the rubber plunger and glue are not getting along very well, as in it fell apart...! So made another using a plastic bowl, some self adhesive foam, a 28mm-22mm plastic pipe reducer and the original MDF disc... Inside the pipe reducer was a plastic washer that has become the bush on the middle tube...
|
|
|
|
12th April 2008... Up to now Dalek has made do with an Asda 79p sink plunger... looked OK but not correct for a NSD. I've had many thoughts about how to make the plunger; buy one off eBay, make one from spare hemis, glue rubber strips onto the original plunger or... cut up another plunger and glue them together... So, got myself some supplies;
Started by making a large hole in a spare MDF circle left from cutting the holes in the shoulders for the gun /arm socket. Glued onto the back of this the two plastic washers and then pushed this over the back of the plunger. The cut up two of the plungers to make the ridges inside and outside of the main plunger and glued these in place. Finally, glued four plastic peg halves to the kitchen unit leg, and used the lip from the plastic waste pipe reducer to make the ridge over the pegs. Not exactly 'screen accurate' but chunky and purposeful - just needs a bit of filler and paint and it's finished...
|
|
|
|
2nd March 2008... Got a few jobs done today; I've redone the gun rods and built an arm... Painted the insides of the ball joints, then filled them with P40 car filler (yuk!) whilst on the gun /arm... having to make two more as the originals shattered when I clamped them in the shoulders...! More messy than planned so they both need a sand... I've stuck the ball joint frames in the shoulders again with P40 car filler, they shouldn't be going anywhere... |
|
|
|
1st March 2008... A Dalek is not very threatening without a gun and sink plunger...!?! I got a few clear plastic globes off eBay - I toyed with making some P40 globes or using metal /wood ball joints, but clear plastic seemed more sensible - I can paint the inside black before filling them so they don't scratch when exterminating intruders...! I drilled each globe, one at 25mm for the gun and the other at 32mm for the arm - both fit quite tight... Next step was cutting two holes in the shoulders for them to sit into, and building the inner frame to hold the ball joints in place. Just need to glue /glass them in now... The only problem is that my gun rods, which I said weren't quite right below, make the gun too wide to pass through the hole so back to the drawing board for them...
|
|
|
|
2nd February 2008... How do you light an eye stalk with no where to pass a wire... you take the advice from 'Dalek Project' and use some threaded lighting rod... great idea but where on earth do they sell it... absolutely no-where...! After countless searches on eBay I found a guy in the States who had a stack of these and he agreed to post a couple over to me, they arrived this week and now my eye stalk has tube to pass the wire for the high powered LED - got this from a PC spares store and it fits snugly in the end of the tube and has enough space to still allow the blue lens to sit flush... I've also redone the mount for the eye stalk. It previously sat on two metal L-brackets but these didn't feel strong enough so I've added an MDF brace, including a 'stop' to keep the eye level... much better... You can also see the motor and controller to allow the dome to turn 360o by remote control...
|
|
|
|
November 2007... The ear cages are snugly fitted around the Moflash lenses, the discs and eyeball are ready to be fitted... |
||
.JPG) |
 |
|
|
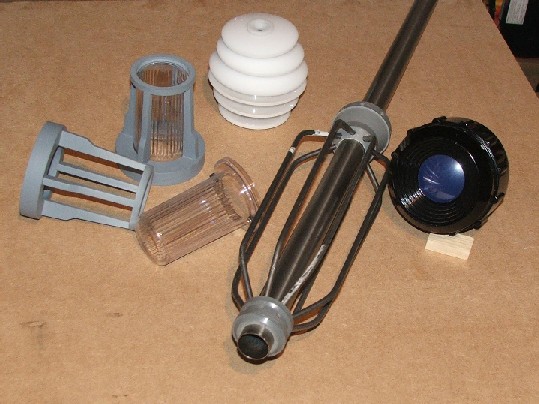
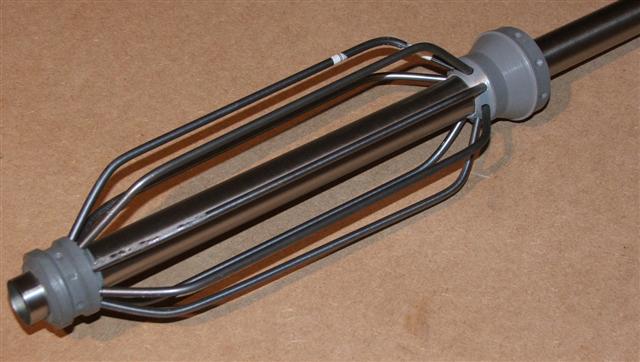
...and the gun is complete... made from resin collars, 5mm rods and a 15mm aluminium clothes rail... just needs paint on the collars... the rods aren't perfect but its a good start... |
||
 |
||

%20(4).JPG)
%20(2).JPG)
%20(3).JPG)
.JPG)
.JPG)
.JPG)
.JPG)
.JPG)
.JPG)
.JPG)
.JPG)
.JPG)
.JPG)
.JPG)
.JPG)
.JPG)
.JPG)
.JPG)
.JPG)
.JPG)
.JPG)
.JPG)
.JPG)
.JPG)
.JPG)
.JPG)
.JPG)
.JPG)
.JPG)
.JPG)
.JPG)
.JPG)
.JPG)
.JPG)
.JPG)
.JPG)
.JPG)
.JPG)
.JPG)
.JPG)
.JPG)
.JPG)
.JPG)
.JPG)
.JPG)
.JPG)